The Main Menu
Overview
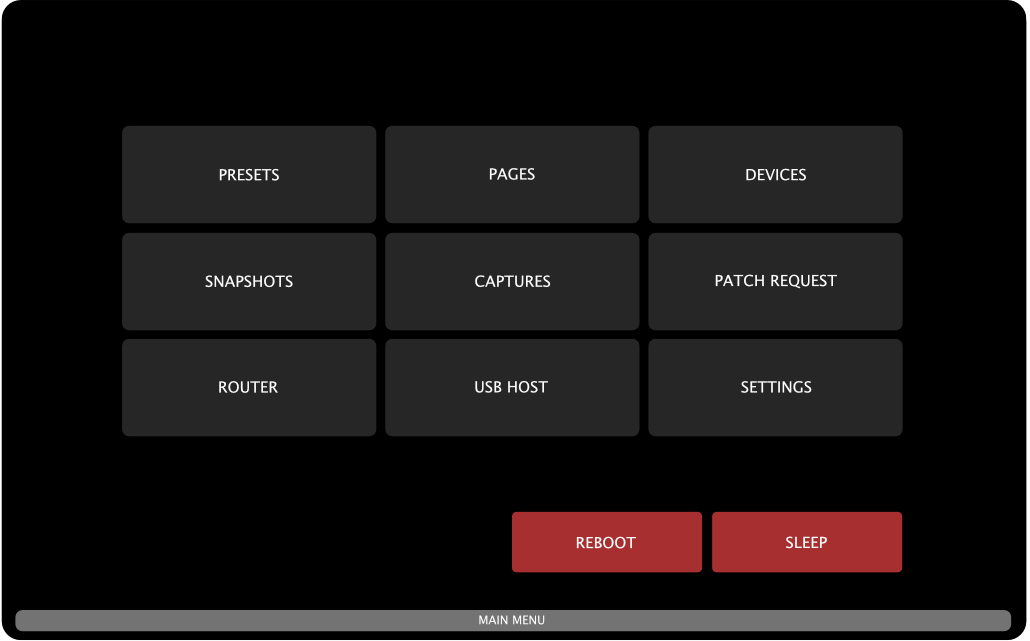
The main Menu gives you access to most of Electra One’s features and configuration options. It’s designed to keep essential functions within easy reach while leaving the hardware buttons free for actions you use more frequently.
To open the main Menu, swipe down on the right side of the touchscreen. Swiping down from the center or left side opens different windows, which are described later in this chapter. You may notice small dotted indicators in the Status Bar — these indicate the touch zones (left, center, and right) for vertical swipe gestures. To open the Menu, make sure you swipe down to the right of the rightmost indicator mark.
Once the menu is open, you can navigate using the on-screen buttons, or swipe down again to close it.
The main Menu provides access to the following features:
- Preset selection
- Page selection within the current preset
- Devices used in the current preset
- Snapshots associated with the current preset
- Captures (recorded MIDI data) for the current preset
- Patch request from a connected MIDI device
- Router configuration
- USB Host management
- Controller settings
- Reboot the controller
- Sleep mode (standby)
Preset selection
There can be up to 72 presets stored in the Electra One controller. They are organized in six banks of twelve presets.
Changing presets
Once you’re on the Preset Selection screen, simply tap the preset you want to load. Alternatively, you can activate it by touching the corresponding knob.

Note: The knob touch feature can be disabled in the controller’s settings if preferred.
The highlighted preset (shown in blue) is the active one — it’s the preset you’re currently working with, and the one sending and responding to MIDI data.
Electra One also supports multiple active presets using a feature called preset pinning. When you pin a preset, it continues to run their Lua and process MIDI even after you switch to another preset. This is useful when you want to keep background controls or automation running from another preset.
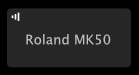
Pinned presets are marked with a small icon in the upper-left corner of their button. We’ll cover how to pin and manage presets in more detail later in this guide.
It’s also important to understand how loading works. A preset is physically loaded and initialized the first time you use it after powering on the controller. Once loaded, switching back and forth between presets does not reinitialize them — they retain their previous state. However, unselected (but previously loaded) presets remain inactive: they do not process MIDI or run Lua scripts unless they are pinned.
Changing banks
You can switch between preset banks by tapping the on-screen bank buttons:

Each bank can hold up to twelve presets. Once you select a bank, you can choose a preset from that bank using the method described above.
The active bank is indicated by a thin outline around its button:

The labels and colors of the bank buttons can be customized in the controller’s settings.
Page selection
Each Electra preset can include up to twelve pages of controls. While pages can be selected through the main Menu, this action is so commonly used that it’s typically assigned to a dedicated hardware button. Using a dedicated hardware button gives you an extra benefit of browsing the pages quickly while the button is held pressed.
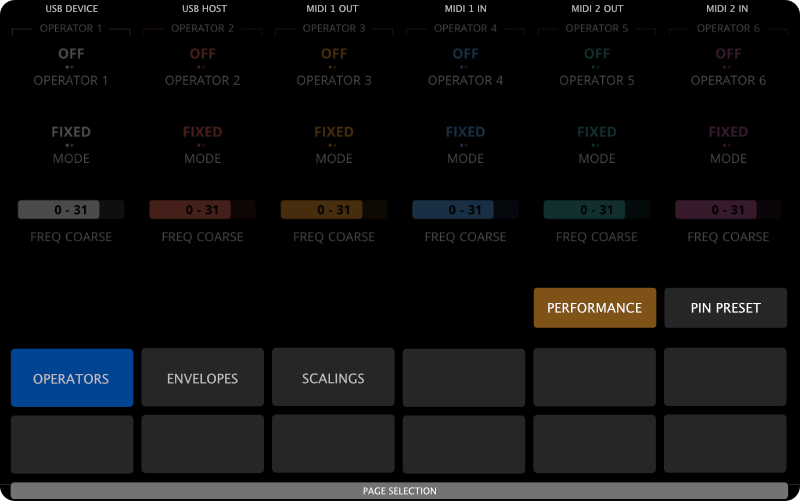
The currently selected page is highlighted. Page names are positioned on screen to align visually with the knobs, making it intuitive to select a page by either tapping the on-screen page button or touching the corresponding knob.
Note: The ability to select pages using knob touch can be disabled in the controller’s settings. When disabled, only touch gestures or hardware buttons will change pages.
Empty (unnamed) page buttons represent unused pages and cannot be accessed.
There are two special buttons on the Page selection: The Performance and the Pin Preset.
Performance button - opens the Performace page if the currently active preset includes one. The Performance page allows you to control a custom selection of parameters across multiple preset pages — all in one place. It’s ideal for performance setups, macro controls, and live tweaks.

Pin Preset button - lets you pin or unpin the current preset. When pinned, the preset remains active and continues processing MIDI even after you switch to a different preset. A small icon appears in the top-left corner of the preset's button to indicate that it’s pinned. When preset is pinned, the button is highlighted (shown in blue).

Devices
The Devices section of the main menu displays how the MIDI devices in the current preset are configured in terms of MIDI ports and channels. Users can use this screen to adjust the MIDI settings of each device to fit their specific setup.
Changes made here do not modify the original preset. Instead, they are saved separately as device overrides. This allows users to customize MIDI port and channel settings without altering the preset itself — ideal for adapting shared or downloaded presets to different hardware setups.
The screen is divided into three parts:
- A list of 16 devices connected to MIDI Port 1
- A list of 16 devices connected to MIDI Port 2
- A form to adjust the settings of the currently selected device
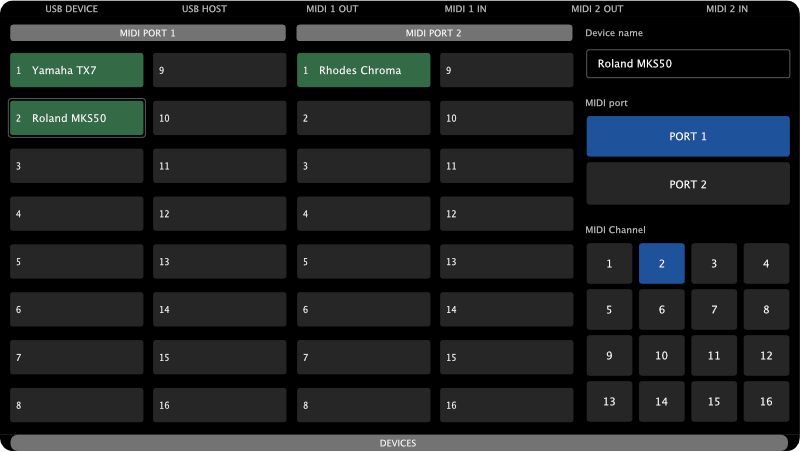
Configured devices are shown in green. The number in front of each entry indicates the MIDI channel. The currently selected device, i.e. the one whose details are shown in the form is highlighted with a light gray outline.
Let’s review the example below:
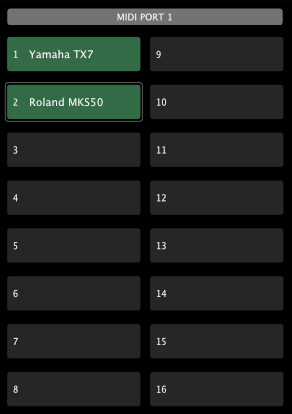
This list shows all MIDI devices connected to MIDI Port 1, whether it's <MIDI IO>, <USB DEVICE>, or <USB HOST>. The Yamaha TX7 is listening on MIDI channel 1, and the Roland MKS50 on channel 2. Other channels are unused.
The Roland MKS50 is currently selected, so its details are displayed in the form:
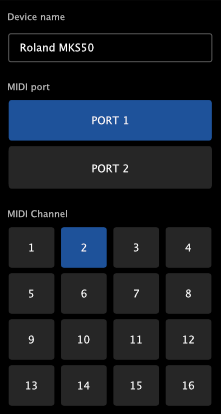
To select another device, simply tap its entry. Note that you cannot select unused channels. The form is easy to use - just tap the MIDI Port and Channel you want to assign. If the selected combination is already used by another device, the controller will swap the devices to accommodate the change.
Snapshots
Snapshots allow you to save and recall the full state of all controls in a preset — effectively capturing a moment in time that you can return to at any point. This is especially useful for performance, sound design, and working with complex setups.

Each preset can contain up to 12 banks, with 36 snapshots per bank, giving you a total of 432 snapshots per preset. The snapshot banks selection is revealed by tapping the [SHOW BANKS] button.

Snapshots are stored per preset projectId, meaning that if the same preset is loaded into multiple slots on your Electra One, those instances will share the same snapshots. If you want each instance to have its own independent set of snapshots, create a copy of the preset (which will get a new projectId) and upload it to the other slot.
When you save a snapshot, the current values of all controls in the preset will be stored in it. There is one exception, controls with the Message type set to None (used to create display-only or virtual controls that are intentionally excluded from snapshot saving)
The Snapshots screen is divided into two main parts: action buttons and a grid of snapshot slots.
The Action buttons
The action buttons allow you to select the operation you want to perform on the snapshot slots. There is one exception: the [SHOW BANKS] button simply opens the bank selection screen.

The currently selected action is highlighted with a light gray outline. In the example above, the Snapshots screen is in LOAD mode—meaning that tapping any snapshot slot will immediately load that snapshot. Tapping a different action button will change the mode accordingly.
Available actions:
[LOAD]- snapshot load mode. A snapshot will be loaded and the snapshots screen closed.[LOAD & STAY]- persistant snapshot load mode. The snapshots screen will not be closed after the snapshot is loaded.[SHOW BANKS]- shows the selection of snapshot banks.[REMOVE]- snapshot remove mode. tapping on snapshot slots will clear them.[SAVE CURRENT]- save snapshot mode. tapping on a snapshot slot will save current values there.
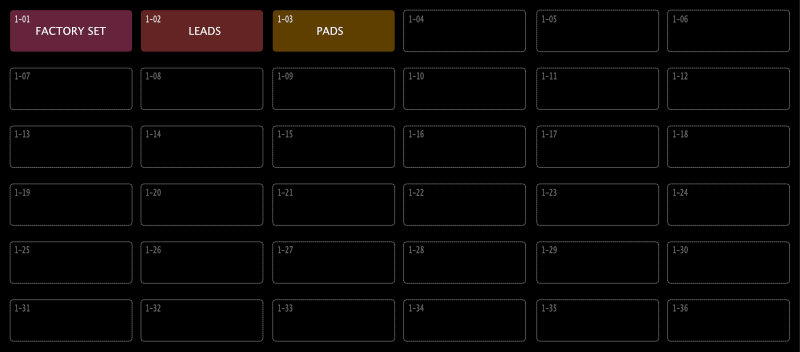
The Snapshots grid
The Snapshots grid displays the available snapshot slots where you can save, load, or remove snapshots. Each bank contains 36 slots, arranged in a 6×6 grid.

The actions performed on the slots depend on the selected mode, which is set using the action buttons described above.
Each snapshot slot includes information about its bank number and position within the bank. For example:
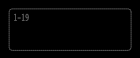
This represents an empty snapshot slot. The 1-19 label in the top-left corner indicates that this is Bank 1, Slot 19.

This represents a used snapshot slot. The 1-15 label indicates Bank 1, Slot 15. Used snapshot slots display a name and a color, making it easier to identify them.
When a new snapshot is saved, it is automatically assigned a default name and color. You can later rename and recolor your snapshots using the Electra One web editor, allowing for better organization and easier recall.
Morphing slots
The top two rows of snapshot slots offer an advanced feature designed for sound design and performance: snapshot morphing.

Under each pair of snapshot slots, you'll see a slider. There are six sliders in total, and each one is linked to two knobs on the controller.
When you touch any of the knobs, the corresponding slider is highlighted and will become armed to snapshot morphing or randomization.
Morphing
The left knob in the pair is used for morphing, ie. a smooth transition (morph) between the two snapshots linked to that slider.

- When the slider is all the way to the left, the values from the left snapshot are used.
- When it is all the way to the right, the values from the right snapshot are used.
- Any position in between blends the values from both snapshots, creating an interpolated (crossfaded) version of the sound.
This feature makes it easy to experiment with new sounds by smoothly transitioning between saved configurations, giving you precise control over your sound in real time.
By using two snapshots in the morphing process, you gain additional control over which parameters are affected and how strongly the transition influences the sound.
Randomization
The right knob in each snapshot pair is used to apply randomization to the control values. While it works similarly to morphing, randomization generates new, random values within a defined range rather than blending existing ones.

The range of randomization is determined by the values in the left and right snapshot slots. For each parameter, the difference between the two snapshots defines the maximum allowed randomization range.
The slider beneath the pair controls the amount of randomization applied:
- With the slider fully left, no randomization is applied.
- Moving the slider towards the right increases the intensity of randomization.
- At the far right, values are randomized across the full range between the two snapshots.
This allows for controlled sound variation while staying within predictable limits defined by the snapshot pair.
Saving morphed and randomized snapshots
Newly created sounds can be saved to snapshot slots by switching to [SAVE CURRENT] mode and tapping the desired snapshot slot.
Captures
The Captures feature allows you to record and play back SysEx messages directly from your Electra One controller. While similar in layout and function to Snapshots, Captures focus on storing full MIDI SysEx messages rather than individual control values. Captures are aimed towards working with SysEx patch and bank dumps.
Each preset has access to 12 banks, with 36 capture slots per bank, giving you a total of 432 capture slots.
Currently, each slot can contain one SysEx message only. We are planning to extend this functonality in near future.
Captures are stored per preset project ID, meaning that if the same preset is loaded into multiple slots on your Electra One, those instances will share the same captures. If you want each instance to have its own independent set of captures, create a copy of the preset (which will get a new project ID) and upload it to the other slot.
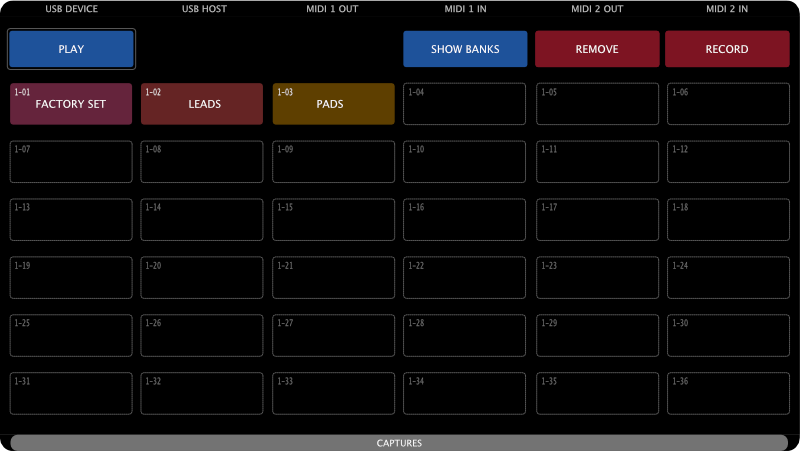
Action Buttons
The action buttons at the top of the Captures screen define what happens when you tap a capture slot.

Available actions:
[PLAY]– Sends the stored SysEx message from the selected slot over MIDI.[SHOW BANKS]– Opens the capture bank selection screen.[REMOVE]– Deletes the SysEx message stored in the selected slot.[RECORD]– Records the next incoming SysEx message and stores it in the selected slot.
The currently active action is highlighted with a light gray outline. After selecting an action, tapping a slot will perform the corresponding operation.
Captures Grid
The Captures grid displays the slots available in the current bank A slot stores one SysEx message.
The Capture grid displays the available capture slots where you can record, play, or remove snapshots. Each bank contains 36 slots, arranged in a 6×6 grid.
The actions performed on the slots depend on the selected mode, which is set using the action buttons described above.
Each capture slot includes information about its bank number and position within the bank. For example:
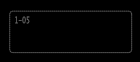
This represents an empty capture slot. The 1-05 label in the top-left corner indicates that this is Bank 1, Slot 5.

This represents a used capture slot. The 1-01 label indicates Bank 1, Slot 1. Used capture slots display a name and a color, making it easier to identify them.
When a new capture is saved, it is automatically assigned a default name and color. You can later rename and recolor your capture using the Electra One web editor, allowing for better organization and easier recall.
Recording a new Capture
Recording a new Capture involves the following three steps:
- Select the record mode by tapping the
[RECORD]button. It will be highlighted with a light gray outline to indicate that recording mode is active. - Choose a capture slot by tapping it. The selected slot will be highlighted with a yellow outline, indicating it is armed and ready to receive a MIDI SysEx message.

- Send the MIDI SysEx message to any of Electra One’s MIDI interfaces.
The controller will automatically stop recording as soon as the first MIDI SysEx message is received. At that moment, the yellow outline will disappear, indicating that the message has been successfully recorded to the slot. The slot will then be assigned a default name and color.
If no SysEx message is received, or if you change your mind, you can disarm the slot by simply tapping it again.
Patch request
If the preset includes instructions to request patch data from a device, tapping the [PATCH REQUEST] button will send the necessary request messages. If the preset includes the patch dump parsing instructions, when the connected device responds with a patch dump via MIDI, the Electra One controller will automatically update the control values to reflect the received patch settings.
If the preset includes instructions to request and parse patch data from a device, tapping the [PATCH REQUEST] button will send the necessary request messages. When the connected device responds with a patch dump via MIDI, and if the preset includes parsing instructions, the Electra One controller will automatically update the control values to reflect the received patch settings.
Router
Electra One features a flexible low-latency internal MIDI router that allows you to route MIDI messages freely between all available interfaces:
<USB DEVICE>- The Electra One USB interface as seen by your computer.<USB HOST>- MIDI devices connected to Electra One’s USB host port.<MIDI IO>- MIDI devices connected to Electra One’s 5-pin DIN MIDI connectors.
Each interface provides two independent MIDI ports: Port 1 and Port 2.
Flexible Routing
With the internal router, you can create custom MIDI paths by routing messages from any source interface/port to any destination interface/port. This gives you full control over how MIDI data flows through your setup, whether you're using external gear, software instruments, or both.
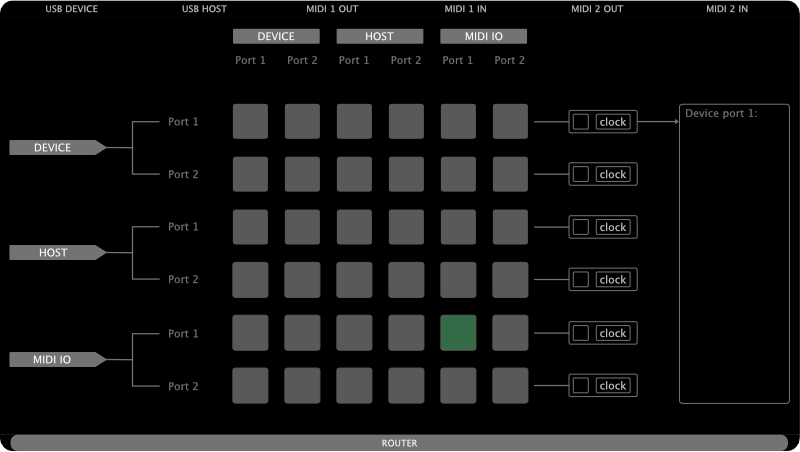
Router Configuration Screen
The Electra One router is fully managed on the Router configuration screen:
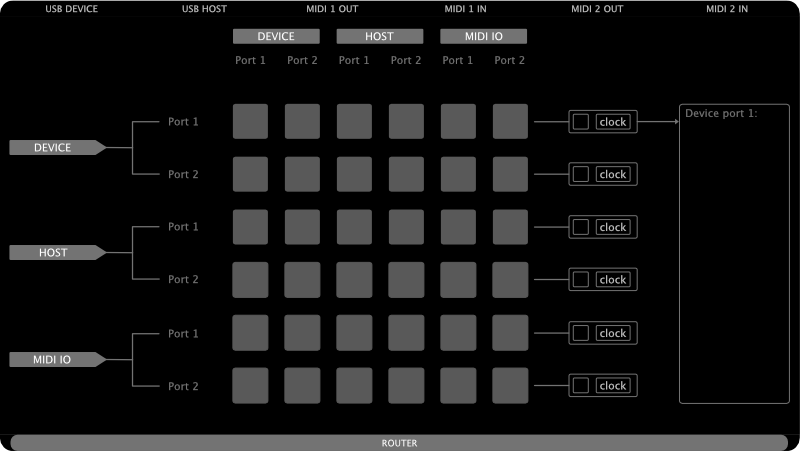
The screen is organized as a 6 × 6 grid, where:
- Rows represent MIDI sources
- Columns represent MIDI destinations
Each cell in the grid represents a possible connection between a source and a destination.
Enabling and Disabling Routes
- To enable a route, tap a cell in the grid. The cell will be highlighted in green, and an arrow will appear, indicating the direction of MIDI data flow.
- To disable a route, tap the same cell again. The highlight and arrow will disappear, and the route will be deactivated.

This makes it easy to visually manage and adjust routing in real time.
This is the default router configuration that Electra One ships with:
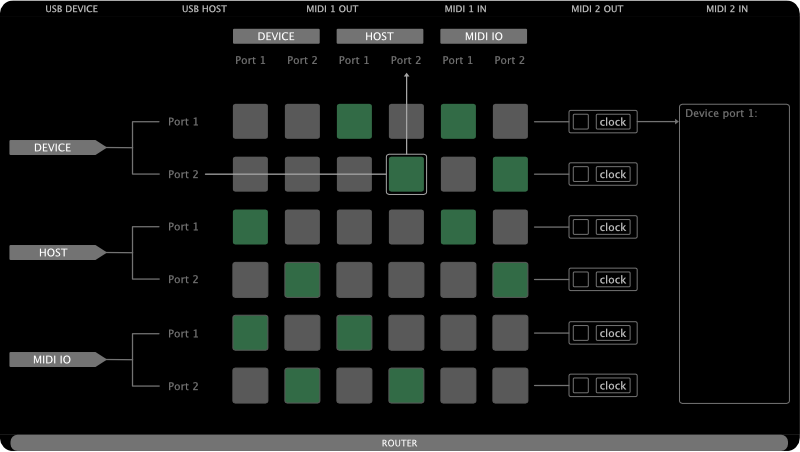
As shown, each MIDI interface forwards both of its ports to the corresponding ports on the other two interfaces.
To help illustrate how routing works, here’s another example showing a simple MIDI Thru setup on <MIDI IO> Port 1. In this configuration, any MIDI data received on <MIDI IO> Port 1 input will be automatically forwarded to the <MIDI IO> Port 1 output.
Built-in MIDI Monitor
To make setting up MIDI routes easier, the Electra One router includes a built-in MIDI monitor.
The monitor displays real-time activity for all MIDI interfaces and their ports, allowing you to quickly confirm that data is being received from connected devices.
There are six activity indicators, one for each interface and port.
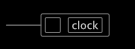
Each indicator provides two visual signals:
- One for incoming MIDI Clock
- One for all other types of MIDI messages
When MIDI data is received, the corresponding part of the indicator flashes to show activity.
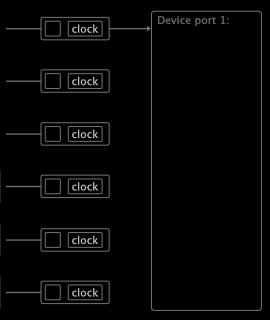
Any of these indicators can be linked to the MIDI monitor log window, which displays detailed information about the incoming messages. A visible arrow between an indicator and the log window shows that a link is active.
To assign an indicator to the log window, simply tap on the indicator.
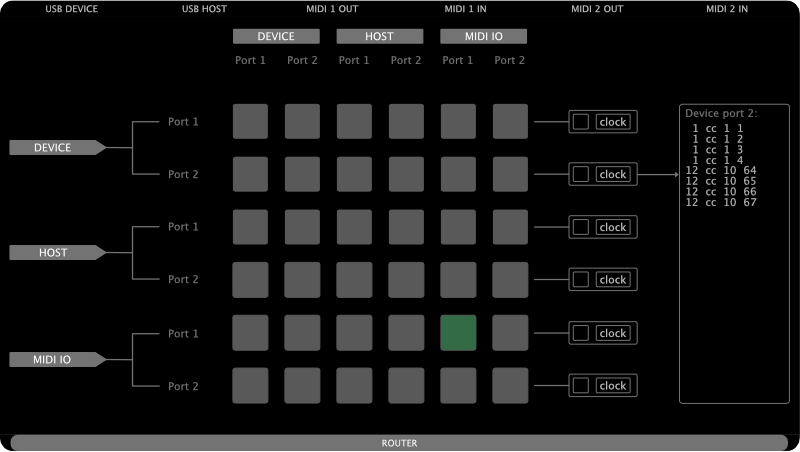
The log window will then show individual MIDI messages along with information about which interface and port they were received from.
Note: The log window monitors MIDI data only from the interface and port selected by tapping the activity indicator. Tapping the routing grid cells has no effect on what is shown in the monitor.
Forwarding to <MIDI IO>
Forwarding messages from fast USB interfaces to the slower <MIDI IO> interface may affect the processing speed of the original messages. This is because the MIDI router adjusts the speed of message forwarding and merging to match the slowest interface involved in the communication.
USB Host
As you’ve learned already, Electra One functions as a USB Host, allowing you to connect up to two USB MIDI devices at the same time.
- One device can be connected directly to Electra's USB Host port.
- To connect two devices, a standard USB hub must be used.
Device Detection and Port Assignment
When a USB MIDI device, such as a controller or synthesizer, is connected, Electra One automatically detects it and displays its available ports on the USB Host configuration screen.
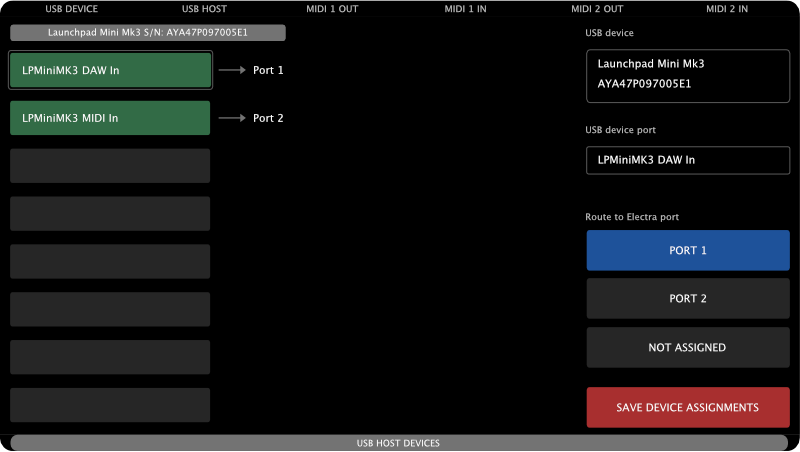
This screen allows you to assign each detected MIDI device port to one of Electra One’s internal ports:
- Port 1
- Port 2
You can also choose to leave a port unassigned if you don’t want Electra to use it.
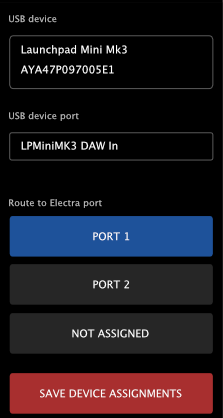
Each connected USB MIDI device is displayed with its name and serial number at the top, along with a list of all its available ports and their current assignments to Electra’s internal ports.
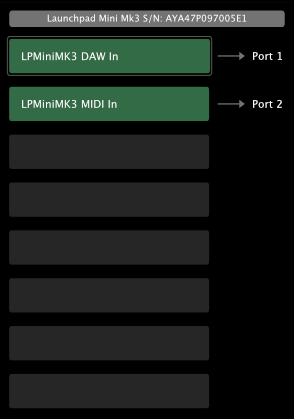
The example above shows a Novation Launchpad connected to Electra One, with its LPMiniMK3 DAW In port assigned to Electra’s internal Port 1, and its LPMiniMK3 MIDI In port assigned to Port 2.
When two devices are connected, two columns (one for each device) will be displayed.
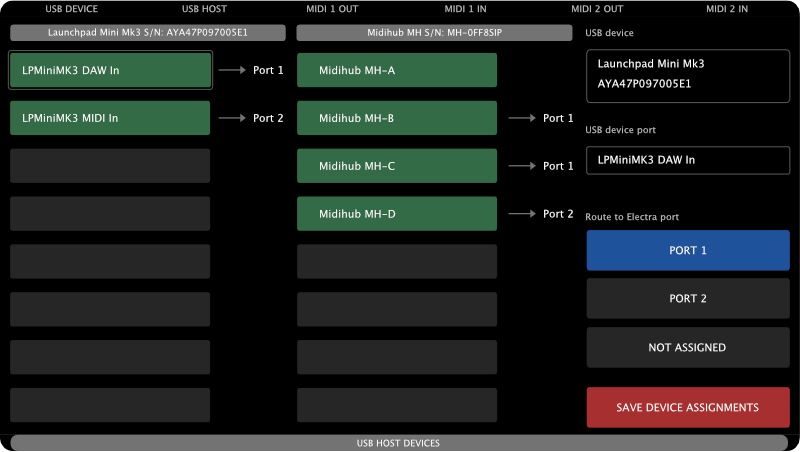
The second device is a Blokas Midihub:
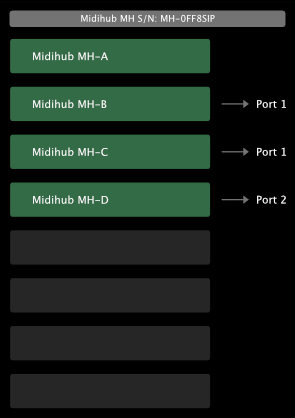
- port MH-A is not assigned
- port MH-B is assigned to Port 1
- port MH-C is assigned to Port 1
- port MH-D is assigned to Port 2
To assign or unassign a port, tap the MIDI device's port (highlighted in green). The selected port will then be outlined in light gray. The right sidebar will update to display relevant information and available actions for that port.
The sidebar shows details about the MIDI device, the selected port, and allows you to assign it to one of Electra One’s ports using [Port 1] or [Port 2] buttons, or to cancel the assignment with [NOT ASSIGNED].
It also includes a button to save all device port assignments (see below).
Saving and Recalling Assignments
Any port assignments you make can be saved. You can do that simply by tapping the [SAVE DEVICE ASSIGNMENTS] button. The next time the device is connected, Electra One will automatically apply the saved settings.
If you connect multiple USB MIDI devices at different times and save their port assignments, Electra One will remember the configuration for each device individually.
This makes it easy to maintain a consistent setup across sessions—whether you're working in the studio or performing live.
Settings
The Settings is used to configure your Electra One controller. Since it contains a wide range of options, it is covered in detail in its own dedicated Settings chapter.
Reboot
The REBOOT button, restarts the Electra One controller.
In addition to performing a standard reboot, this button can be used in combination with key holds to trigger special startup modes.
While tapping the on-screen REBOOT button, you can hold one of the following hardware buttons to modify the startup behavior. Note: You must continue holding the hardware button until the startup animation finishes for the selected mode to take effect.
- Hold
[LEFT-TOP]while tapping REBOOT → The controller will start without loading the default preset. - Hold
[RIGHT-BOTTOM]while tapping REBOOT → The controller will enter bootloader mode for firmware updates, recovery, and the SD card file management.
These combinations are useful for advanced tasks such as troubleshooting and maintenance.
Sleep
The SLEEP button activates Sleep Mode on the controller.
When tapped, the controller enters a low-power state with the display turned off. It also prepares for safe power disconnection by completing any pending file operations and closing its internal database.
While in Sleep Mode, it is safe to disconnect the USB cable, or you can simply leave the controller in Sleep Mode while still connected.
To wake the controller from Sleep Mode, press any hardware button.