Lua extension
This document describes the Lua Extension for the Electra One MIDI Controller firmware. The extension introduces procedural programming capabilities to Electra One presets
Lua is a lightweight scripting language. You can find detailed information on the Official Lua site. Alternatively, you can follow our Lua Crash Course — a short tutorial designed specifically for musicians and non-programmers.
With the Electra Lua extension, you can use the Lua programming language inside Electra One MIDI controllers to easily create, manage, and customize MIDI and music-related actions.
Note
To utilize the Electra One Lua Extension described in this document, you must have Firmware version 4.0 or later installed.
A brief overview
With the Electra One Lua extension, you can extend and customize your presets by adding Lua functions. It allows you to create features and behaviors that simply wouldn't be possible without it. Here are just a few examples of what you can do:
- Send and receive MIDI messages.
- Trigger Lua functions when control values change.
- Format display values.
- Modify the visibility, location, name, and color of controls.
- Execute custom patch dump request calls.
- Craft your own SysEx parsers.
- Calculate checksums and generating custom SysEx template bytes.
- Run Lua functions based on MIDI clock and transport control.
- Create sequences of MIDI data, clock messages, and MIDI LFOs.
- Visualize MIDI data on the controller's screen.
The core idea behind this extension is to clearly separate the static data defined in the declarative JSON preset from the dynamic processing handled at runtime through Lua scripting. The JSON preset acts as the foundation, pre-loading all pages, lists, devices, groups, and controls. Once the preset is loaded, the Lua extension takes over, allowing you to manipulate these objects for specific purposes.
It's important to note that the Lua extension cannot create new objects, but it can modify, reposition, and change the visibility of existing ones.
Uploading the scripts
To enable Lua extension functions within a preset, you must first upload a Lua script file(s). The uploaded script is then associated with the currently active preset. If a Lua script already exists for that preset, uploading a new one will overwrite it.
Normally, each preset uses a single Lua script. If needed, you can upload multiple Lua script files that work together as one larger Lua project.
This document covers the single-file setup. Multi-file configurations are explained in a separate guide about Electra One’s file transfer and management protocol.
Uploading the scripts with the Preset Editor
You can create, edit, and upload Lua scripts directly from the Preset editor — the easiest and recommended way to work with Lua. If needed, you can also upload scripts to the Electra One MIDI Controller using a SysEx call.
Uploading the scripts with a SysEx call
0xF0 0x00 0x21 0x45 0x01 0x0C script-source-code 0xF7Executing a Lua command with a SysEx call
This is a call that executes arbitrary Lua commands, effectively serving as an API endpoint for controlling Electra One presets from external devices and applications.
It allows you to remotely manage Electra One presets using Lua commands, offering a powerful way to interact with the controller from external sources. The maximum allowed length of a Lua command is 65,353 bytes.
However, we recommend keeping commands short — commands shorter than 65 bytes are executed significantly faster than longer ones.
To optimize performance, it is better to use this SysEx call to trigger Lua functions defined in a previously uploaded Lua script, rather than sending large blocks of arbitrary Lua code.
0xF0 0x00 0x21 0x45 0x08 0x0D lua-command-text 0xF7lua-command-text is a free-form string that holds the Lua command to be executed. It must respect the maximum length limit explained above.
An example of the lua-command-text
print ("Hello MIDI world!")The structure of the script
The Electra One Lua Extension script is organized into four distinct building blocks:
- The Setup Section: This section is where you initialize and configure the settings and parameters needed for your script. It acts as the starting point for your script’s execution and often includes setup tasks like defining global variables, establishing MIDI connections, or configuring other necessary resources.
- The Standard Functions: These are predefined functions included in the Electra One Lua Extension scripting environment. They provide the core functionality for interacting with the MIDI controller and its features. Standard functions can be used to send and receive MIDI messages, manipulate controls, and manage various aspects of the controller's behavior.
- The Standard Callbacks: Electra One provides a set of standard callback functions that allow your Lua script to respond to various events. These callbacks are invoked automatically by the system when specific events occur. For example, you can use callbacks to react to control value changes or button presses, adding dynamic and interactive behavior to your script.
- The User Functions: These are custom functions that you define to extend the functionality of your Lua script. User functions allow you to implement unique behaviors, process data, and create specific responses to tailor the script to your needs. They give you the flexibility to customize the Electra One experience according to your requirements.
Once you understand and use these four building blocks, you’ll be able to create powerful Lua scripts that make your Electra One MIDI controller even more capable and flexible.
Let's use the following example to demonstrate it:
-- Display controls related to specific value of another control

-- a function to hide all controls within the groups
function hideAllGroups(groups)
    for groupId = 0, #groups do
        for i, controlId in ipairs(groups[groupId]) do
            control = controls.get(controlId)
            control:setVisible(false)
        end
    end
end

-- show given control group
function showGroup(groups, groupId)
    for i, controlId in ipairs(groups[groupId]) do
        control = controls.get(controlId)
        control:setSlot(i + 1)
    end
end

-- the callback function called from the preset
function displayGroup(valueObject, value)
    hideAllGroups(controlGroups)
    showGroup(controlGroups, value)
end

-- a standard callback function to handle PATCH REQUEST event
function patch.onRequest(device)
    print("Requesting patches from device " .. device.id);
    midi.sendProgramChange(PORT_1, device.channel, 10)
end


-- set the initial state. group 0 is displayed

-- define assignment of controls to groups
controlGroups = {
    [0] = { 20, 21, 22 },
    [1] = { 26, 27, 28 },
    [2] = { 32, 33 }
}

function preset.onLoad()
    showGroup(controlGroups, 0)
end

print("Lua ext initialized")
The setup
The setup section includes all source code that exists outside of any specific function and runs in the global context of the script. In this section, you can perform various tasks such as calling standard functions, executing user-defined functions, initializing global variables, and setting up resources.
Below is an example of a typical setup section from a script:
-- set the initial state. group 0 is displayed

-- define assignment of controls to groups
controlGroups = {
    [0] = { 20, 21, 22 },
    [1] = { 26, 27, 28 },
    [2] = { 32, 33 }
}

function preset.onLoad()
    showGroup(controlGroups, 0)
end

print("Lua ext initialized")
The primary purpose of the setup section is to prepare your extension to handle application events later on. It is executed immediately after the preset is loaded.
The location of the setup code within the script does not affect its functionality — it does not have to be placed at the top. However, if you plan to call your own user-defined functions in the setup section, it’s recommended to either place the setup code after the function definitions or move it into the preset.onLoad() or preset.onReady() functions for better script organization. For more details, see the Preset Initialization section below.
The standard functions
Standard functions include functions from both the Lua standard libraries and the Electra One Extension libraries. They cover a wide range of tasks, such as printing messages, performing mathematical operations, sending and receiving MIDI messages, and interacting with user interface (UI) components.
You can find detailed descriptions of the Lua standard functions in the official Lua documentation, and descriptions of Electra-specific functions in the API Reference later in this document.
As an example, the print function is a typical standard function you will use in your scripts:
print("Lua ext initialized")The standard callbacks
The Electra One Lua Extension provides a set of predefined event handlers, often called callbacks. These callbacks are automatically triggered when specific events happen.
For example:
-- a standard callback function to handle PATCH REQUEST event
function patch.onRequest(device)
    print("Requesting patches from device " .. device.id);
    midi.sendProgramChange(PORT_1, device.channel, 10)
end
In this code snippet, the patch.onRequest function is a standard callback that responds to the 'PATCH REQUEST' event. When the event occurs, this callback runs the actions you have defined: printing a text message and sending out a Program Change MIDI message.
Standard callbacks like this allow you to customize how your Lua script reacts to different events, making your Electra One MIDI controller more interactive and adaptable.
The user functions
As a user, you have the creative freedom to define your own functions. In fact, you are encouraged to do so — user functions are the building blocks for creating more advanced and structured elements in your Lua script.
User functions help you organize your code and extend your script’s capabilities. They let you group specific tasks or behaviors together, making your scripts more modular, easier to manage, and easier to reuse.
For example, the displayGroup function from the earlier source code example is a user-defined function that is linked to a callback hook inside the preset JSON.
-- the callback function called from the preset
function displayGroup(valueObject, value)
    hideAllGroups(controlGroups)
    showGroup(controlGroups, value)
end
Preset initialization
Some presets may require a carefully controlled sequence of actions during startup. The Electra One Lua Extension gives you ways to run your own functions at different stages of the preset loading process. It’s important to understand the order in which these stages happen.
When a preset is loaded for the first time. For example, when you power on the controller — the following steps take place:
- Everything defined in the global context of your Lua script (outside of any function) is executed.
- The
preset.onLoad()function is called, if defined. - All Lua functions linked to Control values are called, using the default values from the preset JSON.
- The
preset.onReady()function is called, if defined. - The
preset.onEnter()function is called, if defined. - Electra One starts listening for external events, like user actions or incoming MIDI messages.
The same sequence of actions is performed when you load any preset for the first time — for example, when switching presets using the user interface. Once a preset has been loaded, switching back to it later will not re-initialize it. The preset is considered already initialized.
Lua Extension API Reference
This section provides a complete reference to all Lua functions available in the Electra One Extension library. You’ll find descriptions, parameters, and usage details for each function, organized by category. These functions allow your script to interact with controls, MIDI messages, graphics, system settings, and more. Use this chapter as a practical guide while developing or exploring your Lua scripts.
Controls
The controls module provides functionality to manage preset controls. It is not intended for changing properties of individual controls. Individual controls are managed by manipulating the Control object.
Functions
Parameters
Returns
Example
-- Retrieving a reference to given control

local control = controls.get(1)
Control
A Control object represents a single control, like a fader or button. It stores its own data and provides functions to read and update its properties.
Functions
Returns
Example
-- Retrieving a control and getting its Id

local volumeControl = controls.get(10)
print("got Control with Id " .. volumeControl:getId())setVisibility() function can update the visibility at runtime. Parameters
Returns
Example
-- a function to toggle visibility of a control

function toggleControl(control)
    control:setVisible(not control:isVisible())
endParameters
Returns
Example
-- print out a name of given control

function printName(controlId)
    local control = controls.get(controlId)
    print ("Name: " .. control:getName())
endParameters
Returns
Example
-- A callback function that changes color of the control
-- when its value exceeds 100

function functionCallback(valueObject, value)
    local control = valueObject:getControl()

    if (value > 100) then
        control:setColor(0xff0000)
    else
        control:setColor (0xffffff)
    end
endParameters
Returns
X, Y, WIDTH, HEIGHTglobals to access individual members of the array. Parameters
X, Y, WIDTH, HEIGHTglobals to access individual members of the array. Returns
Example
-- print out position and dimensions of given control

local control = controls.get(2)
control:setBounds({ 200, 200, 170, 65 })
bounds = control:getBounds()
print("current bounds: " ..
    "x=" .. bounds[X] ..
    ", y=" .. bounds[Y] ..
    ", width=" .. bounds[WIDTH] ..
", height=" .. bounds[HEIGHT])Parameters
Example
-- Reassign the control to different controlSet and pot

local control = controls.get(1)
control:setPot(CONTROL_SET_1, POT_2)Parameters
setSlot(slot), allowing you to specify the target page as well. Parameters
Example
-- Change location of the control within the 6x6 grid

local control = controls.get(1)
control:setSlot(7)value, attack can be used as parameters for the <control>:getValue(valueId) function. Returns
Example
-- list all value Ids of a control

local control = controls.get(1)
local valueIds = control:getValueIds ()

for i, valueId in ipairs(valueIds) do
    print(valueId)
endvalue will be used as the default valueId. List of available valueIds: - value
- attack
- decay
- slope
- break
- sustain
- release
- x
- y
- l1
- r1
- l2
- r2
- l3
- r3
- l4
- r4
Parameters
Returns
Example
-- Display min and max display values

local control = controls.get(1)
local value = control:getValue("attack")

print ("value min: " .. value:getMin())
print ("value max: " .. value:getMax())Returns
Example
-- list all value objects of a control

local control = controls.get(1)
local valueObjects = control:getValues()

for i, valueObject in ipairs(valueObjects) do
    print(string.format ("%s.%s", control:getName(), valueObject:getId()))
endParameters
Parameters
Parameters
Controller
The controller module provides functionality to query information about the controller hardware and the firmware, and to check compatibility.
Functions
Returns
Returns
Returns
Returns
Returns
assert() function. Parameters
Parameters
Returns
Example
-- Check if model and firmware requirements are met
-- Note: assert will terminate the script on a failed check
assert(
    controller.isRequired(MODEL_MK2, "4.0.0"),
    "Version 4.0.0 or higher is required"
)

-- Check if model and firmware requirements are met
-- Note: this will not terminate the script
local validToRun = controller.isRequired(MODEL_MK2, "4.0.1")

if validToRun == true then
  print("requirements met")
else
  print("requirements failed")
end

-- Query information about the controller and the firmware
print("model: " .. controller.getModel())
print("numeric model: " .. controller.getNumModel())
print("firmware version: " .. controller.getFirmwareVersion())
print("numeric firmware version: " .. controller.getFirmwareNumVersion())

-- Query system uptime
print("uptime: " .. controller.uptime() .. " msecs")Data Pipe
Data pipes let presets share information with each other. Think of a data pipe as a named channel where one preset can send a stream of numbers, and another preset can receive them.
This is useful when you want different presets to work together. For example, you can create an LFO preset that continuously sends out modulation values. Another preset can then receive that stream and use it to control things like knobs or sliders — without changing its own internal setup.
This makes it easy to build flexible and creative setups where presets interact in real time.
Functions
Parameters
Returns
Parameters
Parameters
Devices
A Device represents a musical instrument connected to one of Electra’s hardware ports and listening on a particular MIDI channel. The devices module provides functionality to query and create devices.
Functions
Parameters
Returns
Parameters
Returns
Parameters
Returns
Device
A Device object is used to manage the Device settings.
Functions
devices.create() function. Returns
Parameters
Returns
Parameters
Returns
Parameters
Returns
Parameters
Returns
Example
-- This needs to reflect the preset device settings
local AccessVirusDeviceId = 2


-- Display info about the device
local device = devices.get(AccessVirusDeviceId)
print ("device port: " .. device:getPort())
print ("device channel: " .. device:getChannel())


-- A function to set channel of device with a Control
function setChannel(control, value)
    device = devices.get(AccessVirusDeviceId)
    device:setChannel(value)
end
Events
The Events library lets you control which notifications Electra One sends out and define callback functions to handle those events.
Functions
Parameters
Example
-- Sending MIDI messages out

print ("Events demo")

events.subscribe(PAGES | POTS)
events.setPort(PORT_CTRL)

function events.onPageChange(newPageId, oldPageId)
  print ("old: " .. oldPageId)
  print ("new:" .. newPageId)
end

function events.onPotTouch(potId, controlId, touched)
  print ("potId: " .. potId)
  print ("controlId: " .. controlId)
  print ("touched: " .. (touched and "yes" or "no"))
endParameters
Parameters
Parameters
Graphics
The Graphics module provides drawing functions for use within component paint callbacks. Drawing is restricted to the area defined by each component's boundary box.
Technically, it is possible to call the drawing functions outside of the component paint callbacks. However, in such cases, the drawing will not be synchronized with the component repaints, which may result in flickering, overpainting, or the drawings being invisible.
Functions
Parameters
Parameters
Parameters
Parameters
Parameters
Parameters
Parameters
Parameters
Parameters
Parameters
Parameters
Parameters
Parameters
Parameters
Parameters
Groups
The groups module helps you manage groups inside a preset. A Group is a graphical element that organizes and improves the layout of preset pages.
Functions
Parameters
Returns
Example
-- Retrieve a reference to given group

local group = groups.get(1)
Group
A Group object stores its own data and provides functions to update and manage it.
Functions
Returns
Parameters
Returns
setVisibility() function can update the visibility at runtime. Parameters
Returns
Parameters
Returns
Parameters
X, Y, WIDTH, HEIGHTglobals to access individual members of the array. Parameters
X, Y, WIDTH, HEIGHTglobals to access individual members of the array. Returns
Example
-- change group slot and dimentions

-- Verical line only
local group1 = groups.get(1)

print("Label name: " .. group1:getLabel())
group1:setSlot(3, 2)

-- Renctangle group
local group2 = groups.get(2)

print("Label name: " .. group2:getLabel())
group2:setSlot(9, 2, 2)Parameters
Parameters
Parameters
Helpers
The helpers library consists of helper functions to make handling of certain common situations easier.
Functions
Parameters
Parameters
Returns
Parameters
Returns
Example
-- Move control to given slot

control = controls.get(1)
control:setBounds(helpers.slotToBounds (6))
Info
The Info library lets you show custom text messages in the status bar at the bottom of the screen.
Functions
Parameters
Returns
Example
-- Display an info text

info.setText("Hello world")Parameters
Example
-- Retrieve an info text

print("Text shown: " .. info.getText())Logger
Logging is a key element for understanding what is happening inside the controller. The Electra One Lua API provides the print() command, which sends text messages that can be viewed in the Electra One web application. Log messages created with the print() function are always prefixed with lua: text.
In fact, these log messages are SysEx messages sent to the CTRL port. They include both a timestamp and the text of the message. For more details about console logs, please review Electra One’s MIDI implementation.
Because logging uses standard SysEx messaging, users can create their own log viewers or integrate Electra logs into their own applications.
The logger output can be enabled or disabled. When disabled, no log messages are sent over MIDI. By default, the logger is disabled for performance reasons. For more information on how to manage the logger, see the section on enabling and disabling logging.
Functions
Parameters
Example
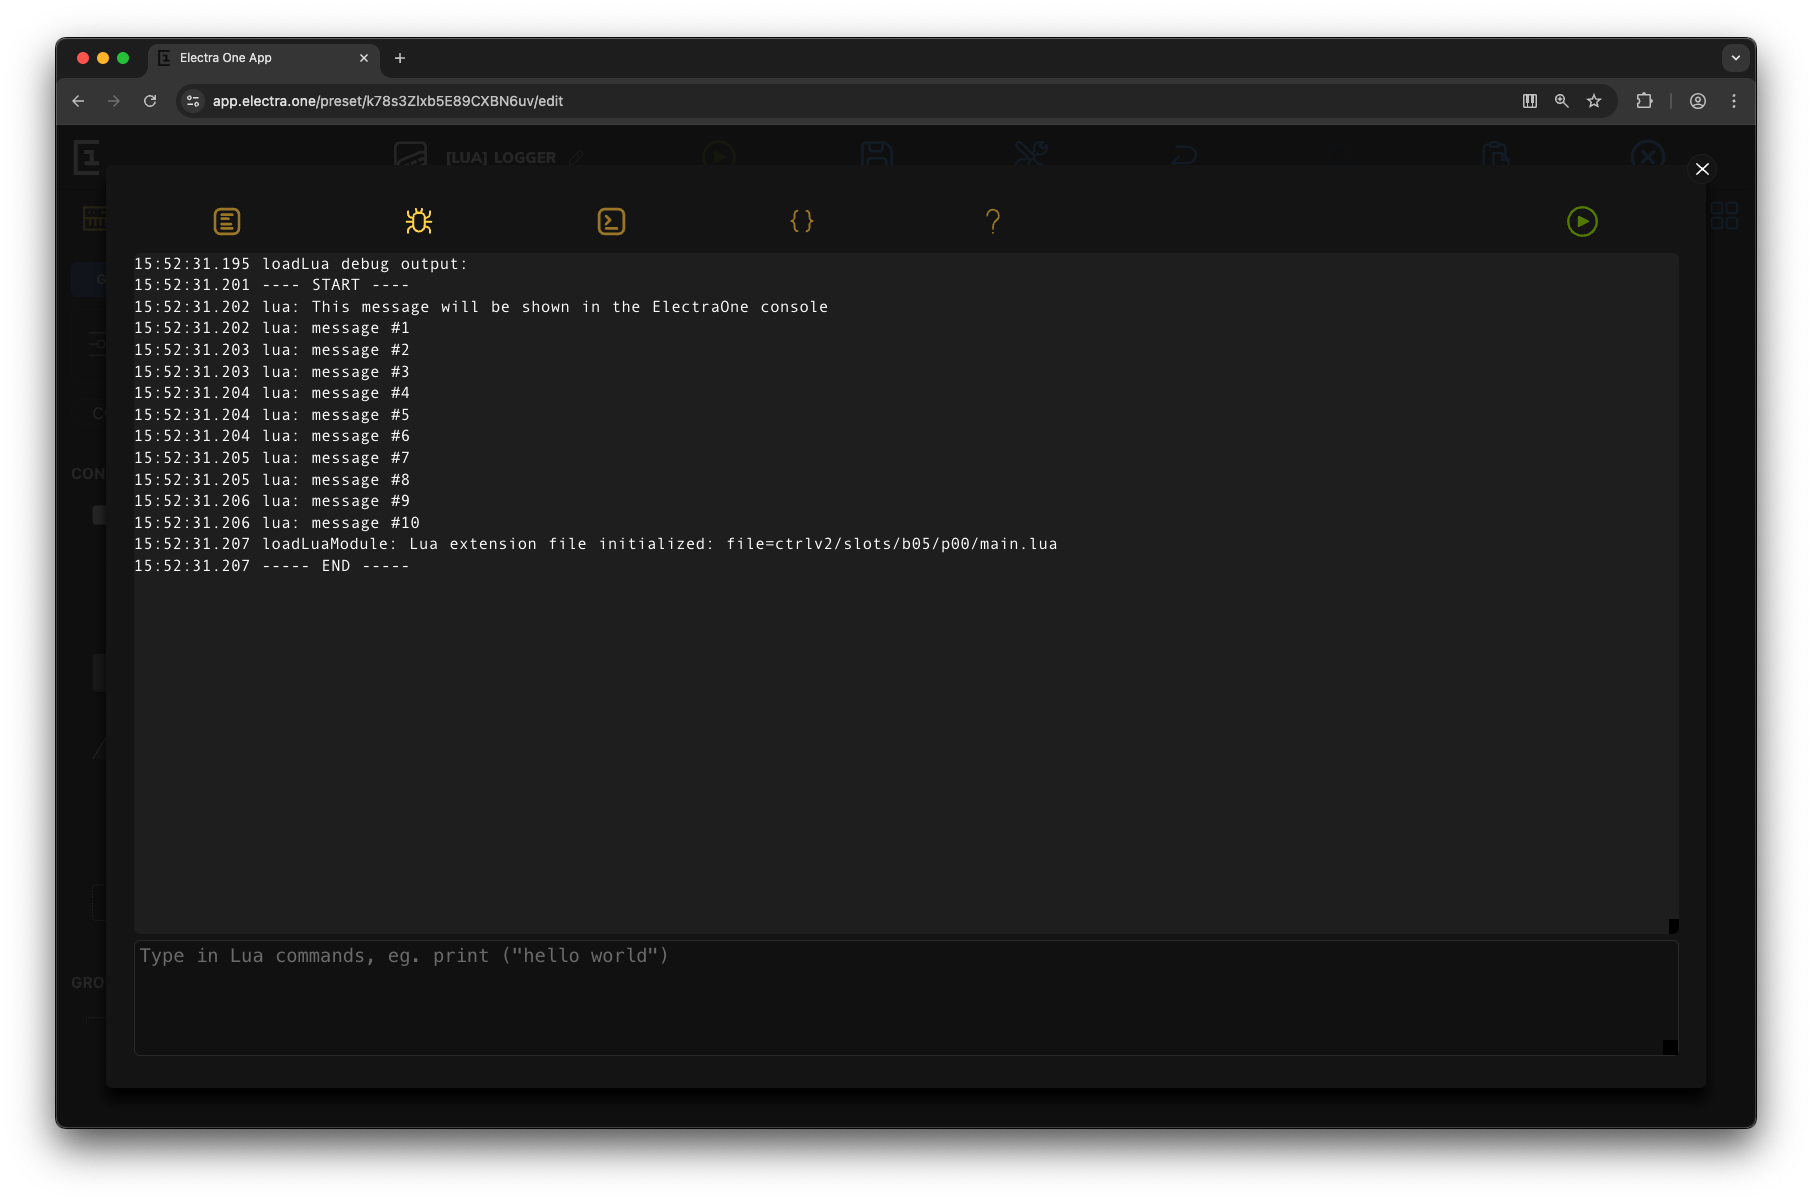
-- Printing to the console log
print("This message will be shown in the ElectraOne console")

for i = 1, 10 do
    print("message #" .. i)
end
The Example will produce following output in the Electra One web application Console
Message
The Message object holds the actual MIDI or virtual message that Control’s Value object sends and receives. Every Value object is linked to exactly one Message object.
Functions
Parameters
Returns
Parameters
Returns
Parameters
Returns
Parameters
Returns
Parameters
Returns
Parameters
Returns
setMin() and setMax() functions. Parameters
Parameters
Returns
Parameters
Returns
Example
-- Print info about the message

function valueCallback (valueObject, value)
    local message = valueObject:getMessage ()

    print ("Device Id: " .. message:getDeviceId ())
    print ("Type: " .. message:getType ())
    print ("Parameter Number: " .. message:getParameterNumber ())
    print ("Current value: " .. message:getValue ())
endMIDI callbacks
MIDI callbacks are used to handle incoming MIDI messages. The general onMessage() callback is called for any incoming MIDI message, while specific callbacks are triggered only for particular message types.
When you define a callback function in your Lua script, the Electra One Lua interpreter automatically registers it. This registration adds a small processing overhead, so it's a good idea not to define empty callback functions that do nothing."
The first parameter of all callback functions is the midiInput. The midiInput is a data table that describes the origin of the message.
midiInput = {
  interface = "USB dev",  -- a name of the IO interface where the messages was received
  port = 0                -- a numeric port identifier
}
The midiMessage data table is another key structure. It contains information about a MIDI message, broken down into its parts. While different types of MIDI messages use slightly different formats, every midiMessage includes the fields channel, type, data1, and data2.
For example, a Control Change message can be access either as:
midiMessage = {
    channel = 1,
    type = CONTROL_CHANGE,
    data1 = 1,
    data2 = 127
}
or
midiMessage = {
    channel = 1,
    type = CONTROL_CHANGE,
    controllerNumber = 1,
    value = 127
}
The full description of all midiMessage variants is provided later in this document.
Functions
Parameters
Parameters
Parameters
Parameters
Parameters
Parameters
Parameters
Parameters
Parameters
Parameters
Parameters
Parameters
Parameters
Parameters
Parameters
Parameters
Parameters
Parameters
Example 1
-- Receiving MIDI messages
--
-- Receiving MIDI messages with a generic midi.onMessage() callback

function midi.onMessage(midiInput, midiMessage)
    if midiMessage.type == SYSEX then
        print("sysex message received: interface=" .. midiInput.interface)

        local sysexBlock = midiMessage.sysexBlock

        for i = 1, sysexBlock:getLength() do
            print (string.format ("data[%d] = %d", i, sysexBlock:peek(i)))
        end
    else
        -- generic approach using the data1 and data2
        print("midi message received: interface=" .. midiInput.interface ..
              " channel=" .. midiMessage.channel ..
              " type=" .. midiMessage.type ..
              " data1=" .. midiMessage.data1 ..
              " data2=" .. midiMessage.data2)

        -- Message type specific attributes
        if midiMessage.type == NOTE_ON then
            print("noteOn received: interface=" .. midiInput.interface ..
                  " channel=" .. midiMessage.channel ..
                  " noteNumber=" .. midiMessage.noteNumber ..
                  " velocity=" .. midiMessage.velocity)
        end
    end
end
Example 2
-- Receiving MIDI messages
--
-- Receiving MIDI messages with callbacks specific to MIDI message type

function midi.onControlChange(midiInput, channel, controllerNumber, value)
    print("controlChange received: interface=" .. midiInput.interface ..
          " channel=" .. channel ..
          " controllerNumber=" .. controllerNumber .. " value=" .. value)
end

function midi.onNoteOn(midiInput, channel, noteNumber, velocity)
    print("noteOn received: interface=" .. midiInput.interface ..
          " channel=" .. channel ..
          " noteNumber=" .. noteNumber .. " velocity=" .. velocity)
end

function midi.onNoteOff(midiInput, channel, noteNumber, velocity)
    print("noteOff received: interface=" .. midiInput.interface ..
          " channel=" .. channel ..
          " noteNumber=" .. noteNumber .. " velocity=" .. velocity)
end

function midi.onAfterTouchPoly(midiInput, channel, noteNumber, pressure)
    print("afterTouchPoly received: interface=" .. midiInput.interface ..
          " channel=" .. channel ..
          " noteNumber=" .. noteNumber .. " pressure=" .. pressure)
end

function midi.onProgramChange(midiInput, channel, programNumber)
    print("programChange received: interface=" .. midiInput.interface ..
          " channel=" .. channel ..
          " programNumber=" .. programNumber)
end

function midi.onAfterTouchChannel(midiInput, channel, pressure)
    print("afterTouchChannel received: interface=" .. midiInput.interface ..
          " channel=" .. channel ..
          " pressure=" .. pressure)
end

function midi.onPitchBendChannel(midiInput, channel, value)
    print("pitchBend received: interface=" .. midiInput.interface ..
          " channel=" .. channel ..
          " value=" .. value)
end

function midi.onSongSelect(midiInput, songNumber)
    print("songSelect received: interface=" .. midiInput.interface ..
          " songNumber=" .. songNumber)
end

function midi.onSongPosition(midiInput, position)
    print("songPosition received: interface=" .. midiInput.interface ..
          " position=" .. position)
end


function midi.onClock(midiInput)
    print("midi clock received: interface=" .. midiInput.interface)
end


function midi.onStart(midiInput)
    print("start received: interface=" .. midiInput.interface)
end


function midi.onStop(midiInput)
    print("stop received: interface=" .. midiInput.interface)
end


function midi.onContinue(midiInput)
    print("continue received: interface=" .. midiInput.interface)
end


function midi.onActiveSensing(midiInput)
    print("active sensing received: interface=" .. midiInput.interface)
end


function midi.onSystemReset(midiInput)
    print("system reset received: interface=" .. midiInput.interface)
end


function midi.onTuneRequest(midiInput)
    print("tune request received: interface=" .. midiInput.interface)
end


function midi.onSysex(midiInput, sysexBlock)
    print ("sysex message received: interface=" .. midiInput.interface)

    -- print the received data
    for i = 1, sysexBlock:getLength() do
        print(string.format ("data[%d] = %d", i, sysexBlock:peek(i)))
    end
end
MIDI functions
The MIDI library provides functions for sending raw MIDI messages. There are two ways to send MIDI messages: by composing a midiMessage data table and passing it to the generic midi.sendMessage() function, or by calling dedicated functions for specific message types, such as midi.sendNoteOn().
MIDI messages can be sent to all of Electra’s interfaces (USB Dev, USB Host, MIDI IO) or just one specific interface. This depends on whether you pass an Interface Type as the first argument to the function.
The following call will send the None Off MIDI message to all available MIDI interfaces:
midi.sendNoteOff(port, channel, noteNumber, velocity)while
midi.sendNoteOff(interface, port, channel, noteNumber, velocity)will send it to a specific MIDI interface.
Functions
Note
For simplicity, functions will be listed here without the leading MIDI interface parameter.
Parameters
Parameters
Parameters
Parameters
Parameters
Parameters
Parameters
Parameters
Parameters
Parameters
Parameters
Parameters
Parameters
Parameters
Parameters
Parameters
Parameters
Parameters
Parameters
Parameters
Parameters
Parameters
Example
-- Sending MIDI messages using the sendMessage ()

-- Control Change
midiMessage = {
   channel = 1,
   type = CONTROL_CHANGE,
   controllerNumber = 1,
   value = 127
}
midi.sendMessage(PORT_1, midiMessage)


-- Note On
midiMessage = {
   channel = 1,
   type = NOTE_ON,
   noteNumber = 60,
   velocity = 100
}
midi.sendMessage(PORT_1, midiMessage)


-- Note Off
midiMessage = {
   channel = 1,
   type = NOTE_OFF,
   noteNumber = 60,
   velocity = 100
}
midi.sendMessage(PORT_1, midiMessage)


-- Program Change
midiMessage = {
   channel = 1,
   type = PROGRAM_CHANGE,
   programNumber = 10
}
midi.sendMessage(PORT_1, midiMessage)


-- Pitch Bend
midiMessage = {
   channel = 1,
   type = PITCH_BEND,
   value = 513
}
midi.sendMessage(PORT_1, midiMessage)


-- Poly Pressure
midiMessage = {
   channel = 1,
   type = POLY_PRESSURE,
   noteNumber = 60,
   pressure = 100
}
midi.sendMessage(PORT_1, midiMessage)


-- Channel Pressure
midiMessage = {
   channel = 1,
   type = CHANNEL_PRESSURE,
   pressure = 64
}
midi.sendMessage(PORT_1, midiMessage)


-- Clock
midiMessage = {
   type = CLOCK
}
midi.sendMessage(PORT_1, midiMessage)


-- Start
midiMessage = {
   type = START
}
midi.sendMessage(PORT_1, midiMessage)


-- Stop
midiMessage = {
   type = STOP
}
midi.sendMessage(PORT_1, midiMessage)


-- Continue
midiMessage = {
   type = CONTINUE
}
midi.sendMessage(PORT_1, midiMessage)


-- Active Sensing
midiMessage = {
   type = ACTIVE_SENSING
}
midi.sendMessage(PORT_1, midiMessage)


-- System Reset
midiMessage = {
   type = RESET
}
midi.sendMessage(PORT_1, midiMessage)


-- Song Select
local ss = {
   type = SONG_SELECT,
   songNumber = 20
}
midi.sendMessage(PORT_1, ss)


-- Song Position
midiMessage = {
   type = SONG_POSITION,
   position = 10
}
midi.sendMessage(PORT_1, midiMessage)


-- Tune Request
midiMessage = {
   type = TUNE_REQUEST
}
midi.sendMessage(PORT_1, midiMessage)
Example
-- Sending MIDI messages out

print ("Sending MIDI out demo loaded")


-- Control change
midi.sendControlChange(PORT_1, 1, 10, 64)

-- Notes
midi.sendNoteOn(PORT_1, 1, 60, 100)
midi.sendNoteOff(PORT_1, 1, 60, 100)

-- Program change
midi.sendProgramChange(PORT_1, 1, 10)

-- Pitch bend
midi.sendPitchBend(PORT_1, 1, 513)

-- Polyphonic aftertouch
midi.sendAfterTouchPoly(PORT_1, 1, 60, 100)

-- Channel aftertouch
midi.sendAfterTouchChannel(PORT_1, 1, 100)

-- Send NRPN
midi.sendNrpn(PORT_1, 1, 512, 8192)

-- Send RPN
midi.sendRpn(PORT_1, 1, 1, 4096)

-- Send Control change 14bit
midi.sendControlChange14Bit(PORT_1, 1, 1, 2048)

-- Clock
midi.sendClock(PORT_1)

-- Start
midi.sendStart(PORT_1)

-- Stop
midi.sendStop(PORT_1)

-- Continue
midi.sendContinue(PORT_1)

-- Active sensing
midi.sendActiveSensing(PORT_1)

-- System reset
midi.sendSystemReset(PORT_1)

-- Song select
midi.sendSongSelect(PORT_1, 1)

-- Song position
midi.sendSongPosition(PORT_1, 200)

-- Tune request
midi.sendTuneRequest(PORT_1)

-- SysEx
midi.sendSysex(PORT_1, { 67, 32, 0 })
Overlays
The Overlays module provides functionality for managing preset overlays. An overlay is a list of MIDI values, with each entry containing a MIDI value, a text label, and optional bitmap data. Overlays provide options for List controls and can also replace display values for Faders
Functions
Parameters
Returns
Parameters
Returns
The Overlay Lua table must be structured as shown below. value is the MIDI value, label is a text label associated with the MIDI value.
overlayData = {
    { value = 1, label = "Room" },
    { value = 2, label = "Hall" },
    { value = 3, label = "Plate" },
    { value = 4, label = "Spring" }
}
Overlay
An Overlay object stores the data and functions used to manage an overlay.
Example
-- Define reverb and delay types with associated values and labels
local listReverbTypes = {
    { value = 1, label = "Room" },
    { value = 2, label = "Hall" },
    { value = 3, label = "Plate" },
    { value = 4, label = "Spring" }
}

-- Create a new overlay
overlays.create(2, listReverbTypes)Pages
The pages module allows you to get information about pages, check their status, and switch from one page to another.
Functions
Parameters
Returns
Returns
Returns
Parameters
Parameters
Returns
Parameters
Example
-- Retrieve a reference to given page

local page = pages.get(3)
Page
A Page object stores its own data and provides functions to update and manage it.
Functions
Returns
Parameters
Returns
Parameters
Returns
Example
-- change name of a pge

local page = pages.get(1)

page:setName("LPF")
print("page name: " .. page:getName())Parameter Map
The Parameter Map is the central part of the Electra Controller firmware. It keeps track of all parameter values across connected devices. Whenever a MIDI message is received, a knob is turned, or a value is changed by touch, the Parameter Map records the change, updates everything that depends on it, and sends out new MIDI messages.
Functions
Parameters
Parameters
Parameters
Parameters
Parameters
Parameters
Parameters
Example
-- Display info about the change in the ParameterMap

function parameterMap.onChange(valueObjects, origin, midiValue)
    print(string.format ("a new midiValue %d from origin %d",
        midiValue, origin))

        for i, valueObject in ipairs(valueObjects) do
            local control = valueObject:getControl()
            print(string.format("affects control value %s.%s",
                control:getName(), valueObject:getId()))
        end
end
parameterMap.keep() function call. parameterMap.keep() function call. Patch
This library helps you request patch dumps and process SysEx MIDI messages that contain patch data. The patch.onResponse() function is called automatically when a SysEx message matches the response header you defined in the preset JSON.
To use patch callbacks, you must first create a Patch object in the Device object defined in your preset JSON.
The example below shows the simplest Patch setup. Here, patch.onResponse() will be triggered whenever a SysEx message begins with the bytes 67, 0, 0, 1, 27.
"patch":[
   {
      "responses":[
         {
            "id":1,
            "header":[
               67,
               0,
               0,
               1,
               27
            ]
         }
      ]
   }
]
Functions
Parameters
Parameters
Example
-- Issue a patch requests
patch.requestAll()

-- Send a program change
function patch.onRequest(device)
    print ("Requesting patches...");

    if (device.id == 1) then
        midi.sendProgramChange(PORT_1, device.channel, 10)
    end
end

-- Parse an incoming response
function patch.onResponse(device, responseId, sysexBlock)
    -- print the header information
    print("device id = " .. device.id)
    print("device channel = " .. device.channel)
    print("device port = " .. device.port)
    print("responseId = " .. responseId)
    print("manufacturer Id = " .. sysexBlock:getManufacturerSysexId())

    -- print the received data
    for i = 1, sysexBlock:getLength() do
        print("data[" .. i .. "] = " .. sysexBlock:peek(i))
    end

        -- update two parameters
    parameterMap.set(device.id, PT_CC7, 1, sysexBlock:peek(7));
    parameterMap.set(device.id, PT_CC7, 2, sysexBlock:peek(8));
end
Device data table
device = {
  id = 1,                 -- a device Id
  port = 0                -- a numeric port identifier
  channel = 1,            -- a channel number
}
Preset
The preset library offers functions and callbacks to manage events that happen when working with presets.
Functions
Tables
preset.userFunctions table allows you to define up to twelve custom Lua functions that can be triggered from the Preset Menu on the Electra One controller. Each function is assigned to one of the predefined keys: pot1 through pot12. These correspond to the twelve on-screen buttons in the Preset Menu and match the layout of the physical knobs.
Each entry is a table that defines:
call– The Lua function that will be executed when the button is triggered. This is a required field.name– The label that will appear on the on-screen button. This is a required field.close– A boolean value that, when set to true, causes the Preset Menu to close after the function has been executed. This field is optional.
Only the assigned slots will be displayed in the menu. Buttons with a user function appear in blue, and when enabled in the configuration, functions can also be triggered by knob touch.
For more information on enabling knob touch interaction, see: Settings → Interface → Pot Touch Selections.
Example
-- Register the functions for use in the Preset Menu
preset.userFunctions = {
    pot1 = {
        call = printHello,
        name = "Hello",
        close = true
    },
    pot2 = {
        call = printHi,
        name = "Hi",
        close = false
    },
    pot12 = {
        call = printGoodBye,
        name = "GoodBye",
        close = false
    }
}
SysEx byte function
A SysEx byte function is used in SysEx templates, patch requests, and patch response headers to calculate and insert bytes at specific positions within a SysEx message.
The function is given information about the device and a parameter number, and it must return one byte containing a 7-bit value.
Example preset JSON
This example shows how Lua functions are used in both the patch request and the response header. Here, they are used to request and match a SysEx patch dump from a TX7 on a specific MIDI channel.
"devices":[
   {
      "id":1,
      "name":"Yamaha DX7",
      "port":1,
      "channel":16,
      "patch":[
         {
            "request":[
               "43",
               {
                  "type":"function",
                  "name":"getRequestByte"
               },
               "00"
            ],
            "responses":[
               {
                  "header":[
                     "43",
                     {
                        "type":"function",
                        "name":"getResponseByte"
                     },
                     "00",
                     "01",
                     "1B"
                  ],
                  "rules":[
                     {
                        "id":136,
                        "pPos":0,
                        "byte":136,
                        "bPos":0,
                        "size":1,
                        "msg":"sysex"
                     }
                  ]
               }
            ]
         }
      ]
   }
]
The following snippet shows how to use the Lua SysEx byte function in the SysEx template.
"values":[
   {
	  "id":"value",
	  "message":{
		 "type":"sysex",
		 "deviceId":1,
		 "data":[
			"43",
			{
			   "type":"function",
			   "name":"getChannelByte"
			},
			"00",
			"66",
			{
			   "type":"value",
			   "rules":[
				  {
					 "parameterNumber":102,
					 "bitWidth":5,
					 "byteBitPosition":0
				  }
			   ]
			}
		 ],
		 "parameterNumber":102,
		 "min":0,
		 "max":31
	  },
	  "min":0,
	  "max":31
   }
]
Functions
Parameters
Example
-- returns a byte that TX7 uses to identify the MIDI channel

function getChannelByte(device)
    return (0x10 + (device:getChannel() - 1))
end
SysexBlock
An object designed to handle SysEx messages.
In contrast to simple byte arrays, SysexBlock provides efficient tools for working with large SysEx messages, offering stream-like operations such as read, write, and peek.
Functions
Returns
Returns
Parameters
Returns
Parameters
Returns
Parameters
System
The System module offers functions that control system behavior and manage tasks.
Functions
Parameters
Parameters
Timer
The timer library lets you run tasks repeatedly over time. It calls the timer.onTick() function at a set time interval or based on BPM (beats per minute). You can use it to create MIDI clocks, LFOs, and other ongoing processes. The timer is disabled by default, and the starting rate is 120 BPM.
Functions
timer.onTick() is run at given time periods. Returns
timer.onTick() function will be called. Parameters
timer.onTick() function is called. Returns
timer.onTick() function will be called." Parameters
timer.onTick() function. Returns
Example
-- A naive MIDI LFO implementation

faderValue = 0

timer.enable()
timer.setBpm(120 * 16)

function timer.onTick ()
    parameterMap.set(1, PT_CC7, 1, faderValue)
    faderValue = math.fmod(faderValue + 1, 127)
end
Transport
The transport library works like the timer but doesn't generate its own tick signal. Instead, it uses MIDI real-time system and clock messages from an external source. This lets you create processes that stay in sync with an external MIDI clock. The transport is disabled by default.
Functions
transport.onClock() is run at according to the received MIDI clock messages. transport.onClock() will not be called until it is enabled again. Returns
Parameters
Parameters
Parameters
Parameters
Parameters
Parameters
Example
faderValue = 0

function preset.onLoad()
  if (not transport.isEnabled()) then
    transport.enable()
  end

  print("Transport enabled: " .. (transport.isEnabled() and "yes"  or "no"))
end

function transport.onClock(midiInput)
  parameterMap.set(1, PT_CC7, 1, faderValue)
  faderValue = faderValue + 1

  if (faderValue > 127) then
    faderValue = 0
  end
end

function transport.onStart(midiInput)
  print("Start")
end

function transport.onStop(midiInput)
  print("Stop")
end

function transport.onContinue(midiInput)
  print("Continue")
end

function transport.onSongSelect(midiInput, songNumber)
  print("Song select " .. songNumber)
end

function transport.onSongPosition(midiInput, position)
  print("Song position " .. position)
end
MIDI input data table
For more details refer to Data structures section.
midiInput = {
  interface = USB_DEV,  -- an numeric MIDI interface identifier
  port = 0              -- a numeric port identifier
}
Value
A Value object represents a single data value inside a Control. Each Value is identified by a valueId, and a Control can have one or more Values. The Value object describes the data users can change through interaction and provides functions to access and modify that data."
Functions
Returns
Parameters
Returns
Parameters
Returns
Parameters
Returns
Parameters
Returns
Parameters
overlays.create() function. Parameters
Returns
Example
--  swap overlay lists of two controls

local listA = controls.get(1)
local listB = controls.get(2)

local valueA = listA:getValue("value")
local valueB = listB:getValue("value")

print("list A: " .. valueA:getOverlayId())
print("list B: " .. valueB:getOverlayId())

valueB:setOverlayId(1)
valueA:setOverlayId(2)Parameters
<value>:overrideValue() and restores the display of the current value." Returns
Example
-- Get the message associated with the release value

local value = control:getValue("release")
local message = value.getMessage()Returns
Returns
Value formatters
A value formatter is a custom function that formats how a control's value is displayed. It receives a display value as input and returns a new value as a string. This allows users to customize how information appears on the screen in many different ways.
To use a formatter, you must assign it to a Value in the preset JSON by adding a formatter attribute to the Value object.
The value formatter runs automatically whenever the underlying MIDI value changes.
Example preset JSON
"values": [
   {
      "message": {
         "deviceId": 1,
         "type": "cc7",
         "parameterNumber": 2,
         "min": 0,
         "max": 127
      },
      "id": "value",
      "min": 0,
      "max": 127,
      "formatter": "formatFractions"
   }
]
For more detailed information about the preset JSON, visit the Preset JSON format page.
Functions
Parameters
Example
-- Convert number to a range with decimal numbers
function formatFractions(valueObject, value)
    return (string.format("%.1f", value / 20))
end

-- add percentage to the value
function addPercentage(valueObject, value)
    return (value .. "%")
end
Value function callbacks
A value function callback is a user-defined function that lets you run custom actions whenever a control's value changes.
To use a callback, you must assign it to a Value in the preset JSON by adding a function attribute to the Value object. You can think of a callback as a flexible alternative to a Message:
while a Message sends a fixed MIDI command, a function runs dynamic Lua code when the value changes.
Example preset JSON
"values": [
   {
      "message": {
         "deviceId": 1,
         "type": "cc7",
         "parameterNumber": 2,
         "min": 0,
         "max": 127
      },
      "id": "attack",
      "min": 0,
      "max": 127,
      "function": "highlightOnOverload"
   }
]
For more detailed information about the preset JSON, visit the Preset JSON format page.
Functions
Parameters
Example
function highlightOnOverload (valueObject, value)
    if (value > 64) then
        control:setColor (ORANGE)
    else
        control:setColor (WHITE)
    end
end
Window
The Window library gives you control over the graphic component repainting process.
Functions
window.stop() before and window.resume() after your updates, you can speed up the process and display all changes together. Data structures
midiInput
midiInput is a data table that describes the origin of incoming MIDI messages. The consists of information about the MIDI interface and the port identifier.
interface- integer, an identifier of Electra's MIDI interface. (see Globals for details).port- integer, a port identifier (see Globals for details).
Example
midiInput = {
  interface = MIDI_IO,  -- a name of the IO interface where the messages was received
  port = PORT_1                -- a numeric port identifier
}
midiMessage
The midiMessage data table carries the information about a MIDI message broken down do individual attributes. Different types of MIDI messages are represented with slightly different format of the midiMessage data table. The fields channel, type, data1, data2 are, however, common to all types of messages.
For example, a Control Change message can be access either as:
midiMessage = {
    channel = 1,
    type = CONTROL_CHANGE,
    data1 = 1,
    data2 = 127
}
or
midiMessage = {
    channel = 1,
    type = CONTROL_CHANGE,
    controllerNumber = 1,
    value = 127
}channel- integer, a numeric representation of the MIDI channel (1 .. 16).type- integer, an identifier of the MIDI message type (see Globals for details).data1- integer, the first data byte of MIDI message (0 .. 127).data2- integer, the second data byte of MIDI message (0 .. 127).- MIDI message type specific attrbutes are listed below.
Attributes specific to MIDI message types
| MIDI message type | Attributes |
|---|---|
NOTE_ON | noteNumbervelocity |
NOTE_OFF | noteNumbervelocity |
CONTROL_CHANGE | controllerNumbervalue |
POLY_PRESSURE | noteNumberpressure |
CHANNEL_PRESSURE | pressure |
PROGRAM_CHANGE | programNumber |
PITCH_BEND | value |
SONG_SELECT | songNumber |
SONG_POSITION | songPosition |
Globals
The global variables are used to identify common constants that can be used instead of numbers.
Hardware ports
Identifiers of the MIDI ports.
PORT_1PORT_2PORT_CTRL
Interfaces
Types of MIDI interfaces.
MIDI_IOUSB_DEVUSB_HOST
Change origins
Identifiers of the sources of the MIDI value change. Origin is passed as a parameter of the ParameterMap onChange callback.
INTERNALMIDILUA
Parameter types
Types of Electra MIDI parameters. These types are higher abstraction of the standard MIDI message types.
PT_VIRTUALPT_CC7PT_CC14PT_NRPNPT_RPNPT_NOTEPT_PROGRAMPT_SYSEXPT_STARTPT_STOPPT_TUNEPT_ATPOLYPT_ATCHANNELPT_PITCHBENDPT_SPPPT_RELCCPT_NONE
Control sets
Identifiers of the control sets. The control sets are groups of controls assigned to the pots.
CONTROL_SET_1CONTROL_SET_2CONTROL_SET_3
Pots
Identifiers of the hardware pots. The pots are the rotary knobs to change the control values.
POT_1POT_2POT_3POT_4POT_5POT_6POT_7POT_8POT_9POT_10POT_11POT_12
Colors
Identifiers of standard Electra colors.
WHITEREDORANGEBLUEGREENPURPLE
Variants
VT_DEFAULTVT_HIGHLIGHTEDVT_THINVT_VALUEONLYVT_DIALVT_CHECKBOX
Bounding box
Identifiers of individual attributes of the bounding box (bounds).
XYWIDTHHEIGHT
MIDI message types
Identifiers of standard MIDI messages.
CONTROL_CHANGENOTE_ONNOTE_OFFPROGRAM_CHANGEPOLY_PRESSURECHANNEL_PRESSUREPITCH_BENDCLOCKSTARTSTOPCONTINUEACTIVE_SENSINGRESETSONG_SELECTSONG_POSITIONTUNE_REQUESTTIME_CODE_QUARTER_FRAMESYSEX
Controller events
Flags indentifying individual types of events.
NONEPAGESCONTROL_SETSUSB_HOST_PORTPOTSTOUCHBUTTONSWINDOWS
Touch events
Identifiers of touch events used in the Touch callbacks.
DOWNMOVEUPCLICKDOUBLECLICK
Curve segments
Identifiers of the curve segments used in the graphics module.
TOP_LEFTTOP_RIGHTBOTTOM_LEFTBOTTOM_RIGHT
Controller models
Identifiers of the Electra One hardware models.
MODEL_ANYMODEL_MK1MODEL_MK2MODEL_MINI_MK1
Horizontal alignment
Text alignment modes
LEFTCENTERRIGHT